It all started last summer
When my family moved to a new place. In our previous home we had a district heating service that included unlimited hot water for a fixed price. That was awesome - not very environmentally friendly and actually not very cheap, but we never ran out of hot water.

In our new home we are independent from the city’s hot water services. This is good because we pay exactly for the energy we use. It means that we have a 300-liter hot water heater that we turn on when we want to make as much hot water as we need. In most households such a hot water boiler has a thermostat set to a specific temperature and the heater keeps all 300 liters of water as hot as it is set. I do not like this, because regardless of how great the insulation on the water tank is, it loses temperature over time. I needed a smarter system.
Here is what I figured out.
I got a Shelly relay that I built into the main switch of the boiler. With that I can turn the heater on and off.
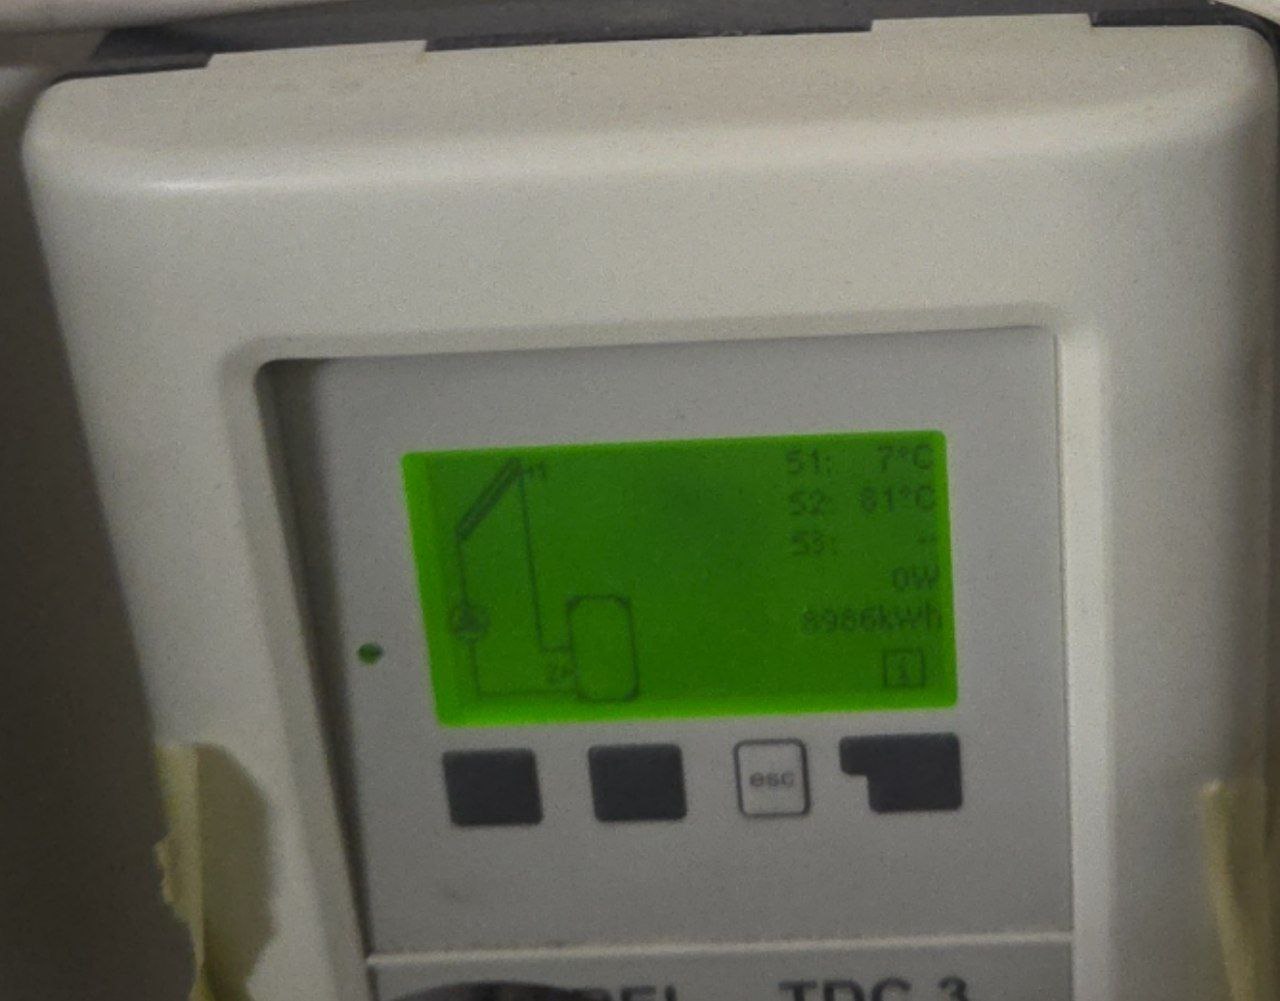
I installed a Raspberry Pi next to the boiler and got a super cheap (preferably second-hand) USB camera to monitor the analog console of the boiler.
Take a photo of the analog console, push the image to a text recognition service, get the actual temperature of the water, send this value to a Grafana dashboard, and make the value available for my Home Assistant.
Make some flexible and smart logic depending on my family’s hot water needs.
Sounds easy, doesn’t it?
Well, the Shelly, Raspberry Pi, and webcam parts were trivial.

The Shelly Plus 1 PM is a max 20-euro investment. It integrates well with Home Assistant and is pretty reliable.
I had a fairly old Raspberry Pi model 3 B+ which I bought in 2018 for about 50 euros. The USB webcam I bought for 4 euros on the local second-hand market.
I am not very much into industrial design so I settled with a “good enough” setup.
For the Raspberry Pi I tried two different operating systems. Both SLE Micro and classic Raspbian do the trick. The only thing I needed was sshd and fswebcam (https://www.sanslogic.co.uk/fswebcam/ ). Both are available from the openSUSE Tumbleweed OSS repository and from the Raspbian repository too.
From my real server basically I need this command to take a good picture of the boiler’s screen:

ssh ${REMOTE_USER}@${REMOTE_HOST} -t "fswebcam --set contrast=70% -D 2 --set brightness=25% -F 10 -r 640x480 -S 30 -d /dev/video0 boiler_screen.jpg"
In the logs it looks like this:
--- Opening /dev/video0...
Trying source module v4l2...
/dev/video0 opened.
No input was specified, using the first.
Setting Brightness to -5 (25%).
Setting Contrast to 14 (70%).
Delaying 2 seconds.
--- Capturing 10 frames...
Skipping 30 frames...
Capturing 10 frames...
Captured 40 frames in 5.40 seconds. (7 fps)
--- Processing captured image...
Writing JPEG image to 'boiler_screen.jpg'.
At this point I have a really good quality picture of the heater’s screen and we can start processing it.
And here the story can continue on three different tracks
Actually, my development evolved as I was not happy with my initial ideas. To be honest I am still not fully satisfied with the latest solutions - but I will cover that later.
At this point I was pretty sure that what I needed was the schoolbook Linux OCR software Tesseract. I simply fed the image to Tesseract, which should extract the temperature of the water, and I am done. Well… I could not have been more wrong.
First of all, Tesseract is pretty picky about the image I fed to it. It took hours of RTFM and trial-and-error with ImageMagick to produce an image that Tesseract liked:
magick /tmp/boiler_screen.jpg -density 300 -depth 8 -resize 1600x1200 -rotate 3 ${crop_params} -threshold 21% -normalize -colorspace Gray -blur 1x1 ${img_output}
And after I found a working set of parameters, I had to realize that with different values and slightly different light conditions, what worked at one time produced total garbage at another time. All in all, Tesseract worked but it was not reliable. Plus, even with perfect parameters, sometimes it just recognized the wrong numbers. Extending hour by hour the hard-coded correction list just felt wrong:
tesseract_output="${tesseract_output//S/5}"
tesseract_output="${tesseract_output//s/5}"
tesseract_output="${tesseract_output//$/5}"
tesseract_output="${tesseract_output//€/6}"
tesseract_output="${tesseract_output//§/6}"
tesseract_output="${tesseract_output//\*/°}"
tesseract_output="${tesseract_output//¢/°}"
tesseract_output="${tesseract_output//\'/°}"
tesseract_output="${tesseract_output//\%/°C}"
I had to admit at one point that it just does not work. Yes, I know Tesseract is a superb tool and it works for thousands of people who use it for scanning books - but with this use case it just fell on its face. I even tried to train Tesseract with my own captured data, but that path does not seem very common on openSUSE and Tesseract crashed during that process.
Let’s try the very fashionable LLM way
So after a long fight I decided that once Large Language Models are here, and there are a good number of online providers, why not give it a try. So I did.
It takes about 40 lines of Python code to call the Gemini API and get the temperature values out of the image:
genai.configure(api_key=API_KEY)
import google.generativeai as genai
[...]
model = genai.GenerativeModel('gemini-2.5-flash-lite')
[...]
contents = [
    {"mime_type": "image/jpeg", "data": image_data},
    "What are the temperature values (including the unit) visible in this image? Return only the temperature values and the unit. Separate the values with empty line.",
]
response = model.generate_content(contents)
[...]
There are two reasons I do not like this solution. First, I hate to send anything to the internet without a good reason - especially to a data-harvesting corporation like Google. Second, this API has a daily query limit, and if I want to know every minute the temperature of my hot water, then I may hit that limit. And that sucks. Sure, one can say that using online generative AI for simple OCR is a massive overkill. Yes, it is. After a few times when my script hit the Gemini API limitations, I decided to move on and use a local solution.
Using Local VLM for the win
On openSUSE Tumbleweed, installing Ollama is a single command:
zypper install ollama
That brings a recent enough 0.13.0 version. But on openSUSE Leap the 0.5.1 version is available. For Alibaba’s vision–language (VL) multimodal model - part of the Qwen 2.5 family released in 2024–2025 - we need the more recent version of Ollama. I picked Qwen 2.5-VL as it is designed to understand and generate both text and images, similar to GPT-4o, LLaVA, or Gemini.
So on openSUSE Leap I needed this command to install a recent Ollama:
curl -fsSL https://ollama.com/install.sh | sh
After Ollama’s installation I pulled the language model:
ollama pull qwen2.5vl:7b
That pulls a massive 6GB model, which raises the question: for a simple image recognition task do I seriously need such a huge tool? But disk space I have enough, and I plan to use this language model for other projects too.
After the model was pulled and Ollama was enabled and started as a systemd service:
sudo systemctl enable ollama
sudo systemctl start ollama
I could test the model:
ollama run qwen2.5vl:7b "What are the temperature values (including the unit) visible in this image? Return only the temperature values and the unit. Separate the values with empty line. /tmp/boiler_screen.jpg"
And here I have to insert one rather strange, yet completely expected, side story.
When I first executed the ollama command with the prompt, I was surprised by how quickly the response came back. It told me that the first temperature value was 20°C, while my actual hot water temperature was 60°C. The first value should have been the temperature of the heat collector on our roof. But… 20°C? In Helsinki. In November. Climate change is real, but not that real.
I became suspicious and checked my prompt. I had a typo in the file name. And instead of giving me the good old “file not found” error, ollama-with the local model-decided to hallucinate an answer. I genuinely didn’t know whether to laugh or be annoyed. Using LLMs in software workflows creates a very special category of failures, and I have to be extra careful with that.
Moving on…
It did the job, but it took about 7 minutes. My server does not have a GPU and its main strength is not computing power. Still, this 7 minutes was a huge turn-down. For two reasons. Primarily because with 7 minutes processing time I cannot get the temperature of my hot water every minute. But mostly I was worried about the power consumption of my server. My server uses on average 56W, but when Ollama was chewing on my request for 7 minutes it went up to 99W. If I need to request the water temperature every seven minutes (which is not enough anyway) between 5am and 9pm every day, then this service will cost me about 250 kWh per year. That would be unacceptable both financially and ecologically.
I tried switching to a smaller OCR-optimized model (deepseek-ocr:3b), which surprisingly made the process even slower (over 8 minutes).
After some reading I realized that the image I was sending to Ollama was far from optimal. It was a 166kB 640×480 JPEG with 96×96 dpi. So once again I went to ImageMagick - which I had heavily used when optimizing the picture for Tesseract - and did my best to reduce the size of the image:
magick /tmp/boiler_screen.jpg -crop 185x105+310+250 +repage -grayscale 'Rec709Luma' -normalize -resize 50% -sharpen 0x1.0 /tmp/simplified_boiler_screen.jpg
This produced a 4kB, 93×53 JPEG image. I was shocked to see that the processing time of the Ollama command went down to 1.7 seconds, which is absolutely acceptable.
And that was the end of my journey with text recognition - from fine-tuning ImageMagick conversions to please Tesseract to optimizing image size for a vision–language multimodal model.
The biggest learning for me in this part of the project was how much difference it makes to give the right prompt and the right-sized input to a model. From the point of computing power and electricity consumption, the difference may be extremely big. I do not want to start moralizing in a tech blog post, but if we consider the carbon footprint of modern generative AI services, it matters a lot to use these tools correctly.
The rest of the project
Once I have the water temperature I send this value to two different places. One is the InfluxDB database which is hooked up to my local Grafana server, so I can monitor the water temperature from there. The other is a Mosquitto MQTT broker that works together with my Home Assistant server.
Installing and setting up the Mosquitto MQTT broker is as simple as one can expect:
sudo zypper install mosquitto mosquitto-clients
sudo systemctl enable mosquitto
sudo systemctl start mosquitto
Naturally the authentication and permissions must be configured in /etc/mosquitto/mosquitto.conf. But after the MQTT broker and the InfluxDB are up and running, sending out the values is simple:
curl -s -i -XPOST ${INFLUXDB_URL} --data-binary "${temp_data}" >> "$LOG_FILE" 2>&1
/usr/bin/mosquitto_pub -h $MQTT_HOST -t "$MQTT_TOPIC/roof" -m "$roof_temp_number"
/usr/bin/mosquitto_pub -h $MQTT_HOST -t "$MQTT_TOPIC/boiler" -m "$boiler_temp_number"
The Home Assistant configuration part is fairly trivial, and I may cover that story in another post - as playing with Home Assistant is a whole different game and it is lots of fun.
The code for those who care
A tech blog post like this wouldn’t be complete without a link to the source code. I’ve pushed everything to GitHub: https://github.com/bzoltan1/boiler-temperature
Naturally, the bash scripts are not directly usable without the proper IP addresses, credentials, and local setup. But they show the full evolution of the project—from the first crude attempts with Tesseract and ImageMagick to the final Ollama-based solution - and they contain most of the commands I have mentioned throughout this post.
If nothing else, they might save someone a few hours of experimentation, or convince them not to over-engineer hot water.